Setting up the Scene
Creating realistic 3D animations in Blender begins with meticulous scene setup. Choosing the right camera angle, adding appropriate materials, and textures are critical details. The careful consideration of these elements ensures a solid foundation for the animation.
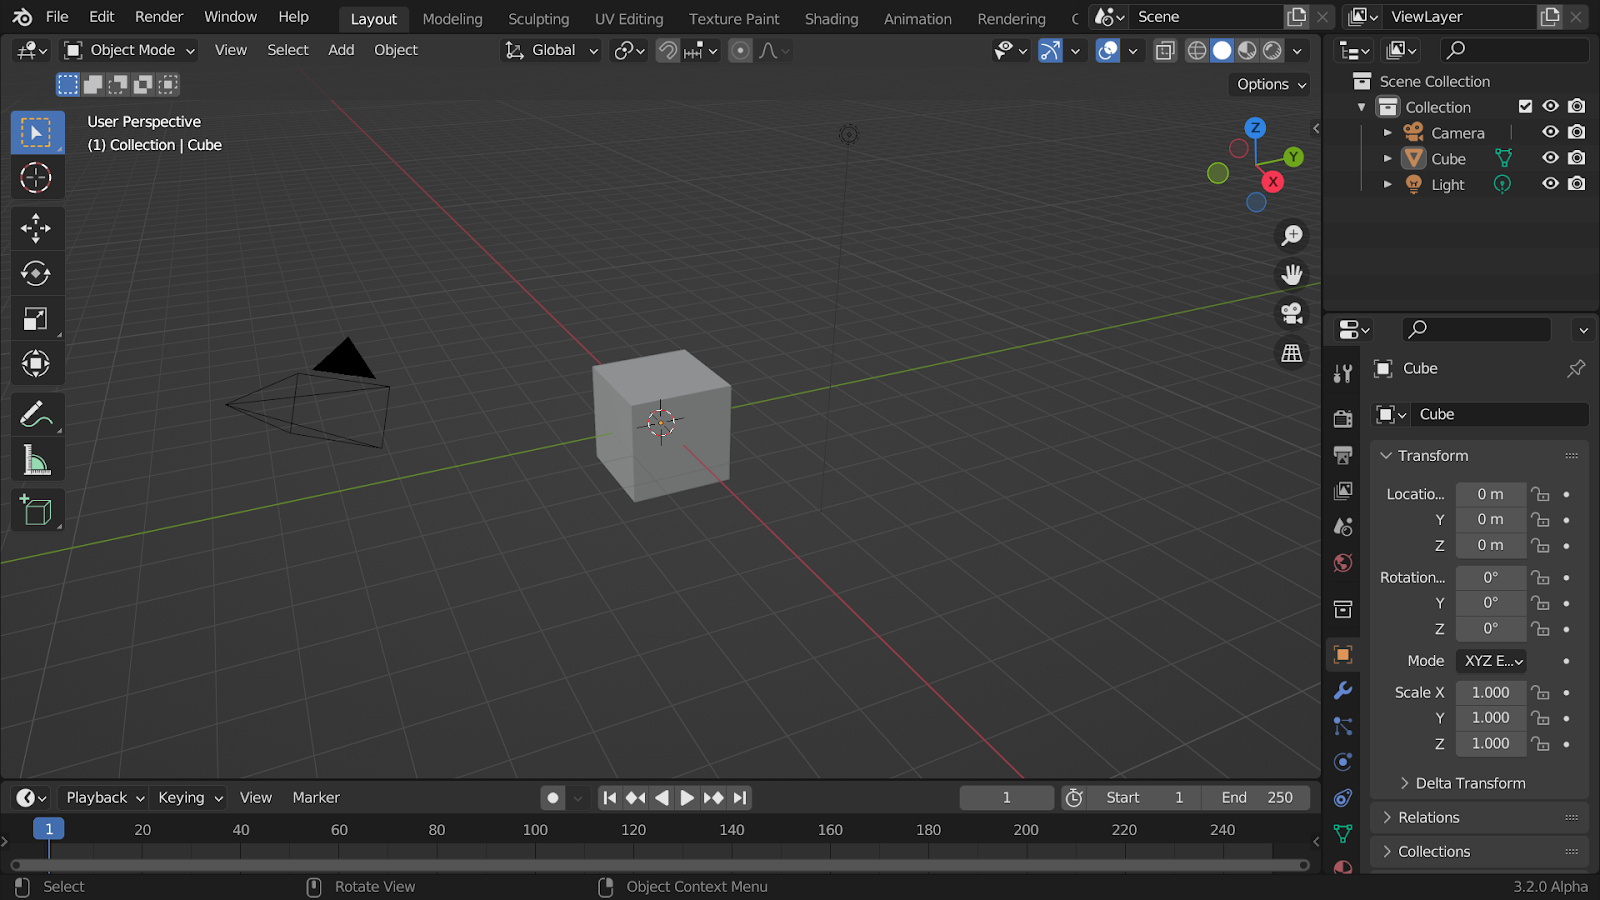
1. Open Blender and select the “Layout” workspace.
2. Use the “Add” menu to insert 3D objects or import models.
3. Position the camera for the desired view and set up lighting.
4. Access the “Shader Editor” to apply materials and textures to objects.
Keyframing and Animation Curves
The heartbeat of any animation lies in keyframing. In Blender, keyframes act as snapshots, capturing the state of objects at specific points in time. Animation curves in the Graph Editor provide a powerful tool for refining these movements. By manipulating these curves, animators gain precise control over timing and object trajectories, resulting in animations that are not just lifelike but also captivating.
- Select an object, go to the “Object” menu, and choose “Insert Keyframe.”
- Move to a different frame, adjust the object’s position, and insert another keyframe.
- Open the “Graph Editor” to refine animation curves for smoother motion.
- Adjust handles and tangents to control acceleration and deceleration.
Fine-tuning with Graph Editor
The Graph Editor in Blender offers a deeper level of control over animations. Fine-tuning becomes an art as animators refine the curves, adjusting easing, speed, and interpolation. This level of detail ensures smooth transitions and realistic motion, adding a layer of sophistication to the final output.
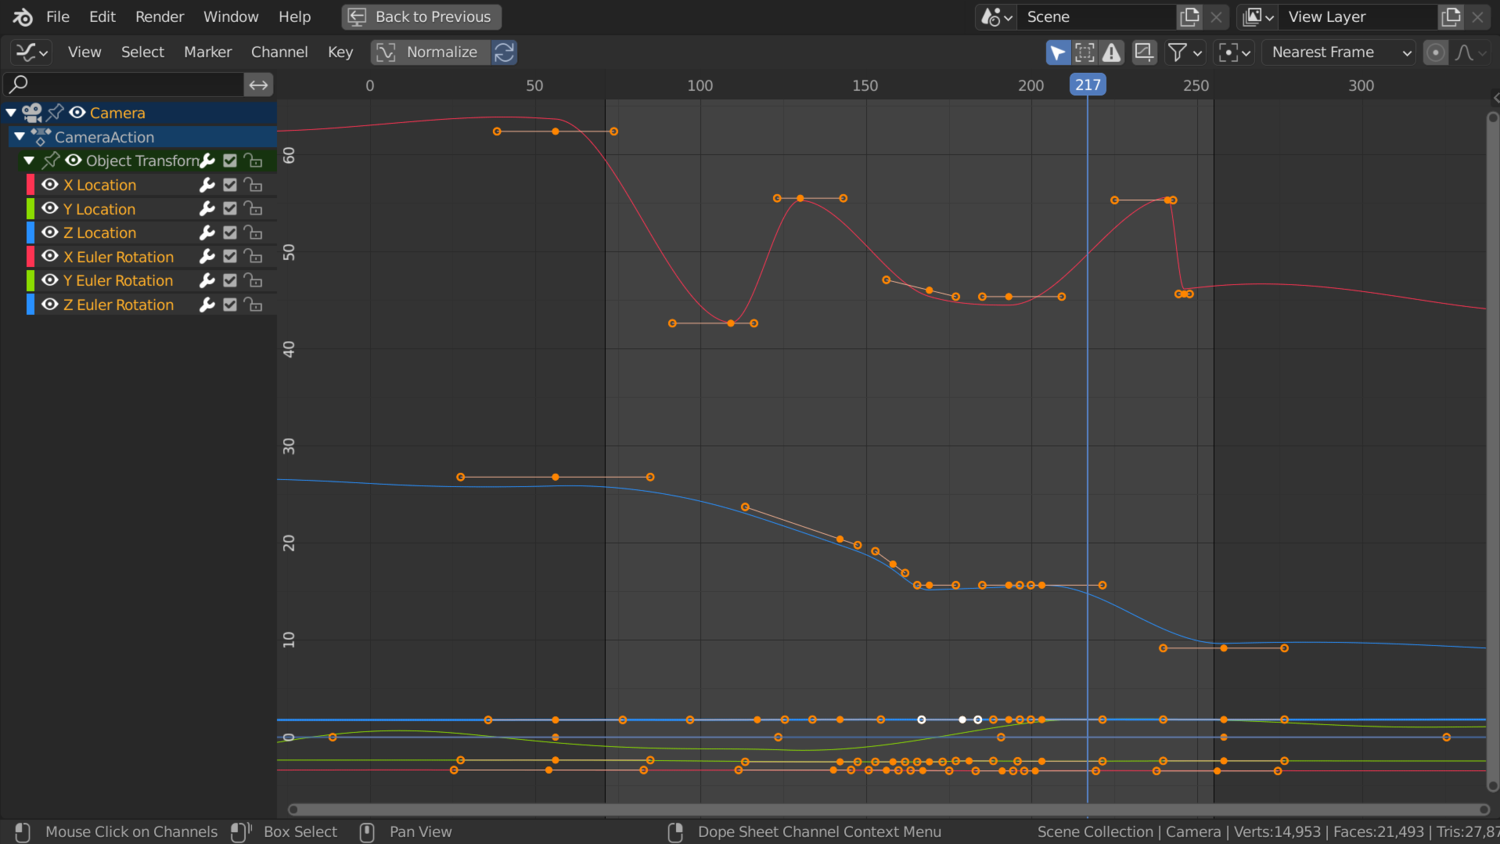
- Open the “Graph Editor” and select the relevant curve.
- Use keyframe handles to control the speed and timing of animations.
- Smooth curves for gradual movements and add sharp angles for dynamic effects.
- Experiment with easing options for more natural transitions.
Technique 2: Mastering Camera Tracking in Blender
Preparing the Footage
Seamlessly integrating 3D objects into live footage requires meticulous preparation. Adding tracking markers to the footage becomes the starting point, providing reference points for Blender’s camera tracking algorithm.
- Import your live footage by selecting “File” > “Import” > “Movie Clip.”
- Open the “Movie Clip Editor” workspace and set the scene frames.
- Add tracking markers to distinguish points for Blender to track.
Tracking Features and Solving the Camera
Blender’s camera tracking functionality analyzes the motion in the footage, solving the camera movement. This process enables precise alignment of virtual elements with the live-action scene, a cornerstone for achieving convincing visual effects.
- In the “Movie Clip Editor,” use the “Track” menu to start tracking features.
- After tracking, go to the “Scene” layout, and select “Set as Background” for the footage.
- Under “Motion Tracking,” choose “Setup Tracking Scene” and then “Solve Camera Motion.”
Integrating 3D Objects into Live Footage
With the camera movement solved, 3D objects can be imported and positioned within the scene to match the live footage seamlessly. This technique opens up a realm of creative possibilities, allowing for the integration of fantastical elements into real-world environments.
- Switch to the “Layout” workspace, import 3D objects, and align them with the scene.
- Use the “Object Constraints” to link 3D objects to specific tracked points.
- Adjust the objects’ scale, rotation, and position to match the live footage.
Technique 3: Advanced Lighting and Rendering in Blender
Utilizing HDRIs for Realistic Lighting
Blender’s extensive lighting options include High Dynamic Range Images (HDRIs), offering realistic reflections and lighting environments. Integrating HDRIs into scenes enhances the authenticity of lighting, bringing a new level of realism to projects.
- Download HDRIs or use built-in ones in Blender.
- In the “World” tab, select “Environment Texture” and load the HDR image.
- Adjust the strength and rotation to control the lighting environment.
Understanding Light Sources and Properties
Mastering Blender’s lighting means understanding the intricacies of light sources and their properties. This knowledge empowers editors to control the mood and atmosphere of scenes, creating visually stunning compositions.
- Place light sources using the “Add” menu.
- Experiment with point, spot, and area lights for different effects.
- Adjust properties such as strength, color, and size for desired illumination.
Optimizing Render Settings for Efficiency
Efficient rendering is crucial for a smooth workflow. Optimizing render settings, such as sample reduction, judicious use of light sources, and employing denoising techniques, significantly improves rendering speed without compromising quality.
- Open the “Render” tab and adjust settings like samples, resolution, and output format.
- Enable denoising options for smoother final renders.
- Utilize GPU rendering for faster results under the “Render” settings.
Technique 4: Seamless Video Editing with Blender’s VSE
Importing and Organizing Video Clips
Blender’s Video Sequence Editor simplifies the import and organization of video clips. Its intuitive interface makes it easy to arrange footage, ensuring a seamless editing process.
- Open the “Video Editing” workspace and select “Add” > “Movie.”
- Import video clips and arrange them on the timeline.
- Trim and split clips using the “Cut” and “Trim” tools.
Editing Video Tracks and Applying Transitions
The VSE provides powerful tools for editing video tracks, applying transitions, and adjusting timing. This feature-rich editor allows for creative storytelling through smooth transitions and effective pacing.
- Add transitions by selecting “Add” > “Effect Strip” > “Cross” or other options.
- Adjust the duration of transitions and apply fades.
- Use the “Transform” tool to pan, zoom, or rotate clips for dynamic effects.
Adding Effects and Adjusting Audio
Blender’s VSE isn’t just about video; it’s a comprehensive tool for adding effects and adjusting audio. From color grading to special effects, the VSE ensures that every aspect of video production is covered in one cohesive platform.
- Apply effects like color correction and filters from the “Add” menu.
- Access the “Audio” workspace to adjust audio levels, add fades, and synchronize with visuals.
- Utilize the “Properties” panel for detailed control over video and audio strips.
Technique 5: Simulating Realistic Physics in Blender
Creating Rigid Bodies and Constraints
Blender’s physics simulation capabilities extend to creating realistic interactions between objects. Rigid bodies and constraints enable editors to simulate collisions and interactions, adding a layer of authenticity to dynamic scenes.
- Switch to the “Layout” workspace and select objects to simulate.
- Under “Physics Properties,” enable “Rigid Body” and set collision types.
- Add constraints like hinges or constraints to control object interactions.
Using Fluid Simulations for Dynamic Effects
Fluid simulations in Blender open doors to dynamic effects, simulating liquids or other flowing substances. This technique adds a level of realism that can be applied to a range of scenarios, from pouring liquids to dynamic environmental effects.

- Select the object to become the fluid domain.
- Enable “Fluid” in the “Physics Properties” and choose the fluid type (liquid, gas, smoke).
- Adjust parameters like resolution and viscosity for desired fluid behavior.
Cloth and Soft Body Simulations for Realism
To bring objects to life, Blender’s cloth and soft body simulations are invaluable. These simulations add realism to materials, simulating the behavior of cloth or soft objects in response to external forces.
- Choose an object and enable “Cloth” in the “Physics Properties.”
- Adjust settings like cloth presets, pinning, and quality.
- Experiment with “Soft Body” settings for flexible, deformable objects.
Frequently Asked Questions (FAQs)
Can Blender be used as a professional video editing tool?
Absolutely. Blender’s extensive features, advanced editing tools, and integration capabilities make it a versatile and professional-grade video editing tool.
What are the advantages of using Blender for 3D animation?
Blender offers a robust animation system, powerful particle system, advanced simulations, and an extensive library of materials. These features collectively make it an ideal choice for creating stunning visual effects.
How can I improve rendering speed in Blender?
Optimizing render settings, reducing sample counts, optimizing light sources, using denoising techniques, and leveraging hardware acceleration are key strategies for improving rendering speed.
Is Blender suitable for compositing and visual effects?
Yes, Blender excels in compositing and visual effects. Its node-based compositor and robust tracking capabilities make it a valuable tool for integrating live footage with 3D elements.
Are there any limitations in Blender’s video editing capabilities?
While Blender’s video editing capabilities are robust, users accustomed to dedicated video editing software may find some features less intuitive. However, with practice, Blender proves to be a highly effective video editing tool.
Conclusion
Blender stands as a powerhouse in the realm of professional video editing, offering a comprehensive set of advanced techniques. By mastering these techniques—from creating realistic 3D animations to seamless video editing, camera tracking, advanced lighting, and physics simulations—video editors can unleash their creativity and storytelling potential. Blender’s diverse capabilities provide an endless playground for pushing the boundaries of what’s possible in the world of video editing. Embrace these advanced techniques, and let Blender be the catalyst for elevating your projects to new heights.